Notification Popup User Guide
This
feature enables the developer to display a notification popup for any event of
their choice
by
providing features such as user targeting, webpage notification, and Deep Link.
ver 1.0
1. Create Popup Space
Before registering notification
popups, a popup space where they will be displayed must be created and secured.
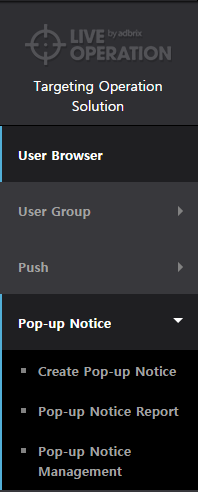
1-1. Select Live Operation,
a targeting-based operation solution.

1-2. Select Notification
Popup > Register Notification Popup in the Live Operation menu.
1-3. Create a popup space.
Click the Add New Pop-up Space to create a location where popups can be
displayed.

1-4. Clicking the Add New Pop-up Space button brings up another popup for more space.
Enter the
required information for each section. Click the Save button
to create a popup space.

- Name:
Enter the name of the popup space to use for the admin. Maximum of 25
characters.
- Key:
Enter the key value to use when integrating the SDK. Enter the lower-case
English characters without spaces.
- Notification
Type: Select the type of notification according to the display settings of
the app (Portrait-Vertical View, Landscape-Horizontal View).
1-5. After a popup
space is created, proceed with the SDK
sync based on the key value.
Go to Preferences > Push Set up/In-app Notice on the screen to verify if the corresponding
popup space has been integrated properly.

 : Double checks the integration status of
the popup space. Integration checks are run every 10 minutes.
: Double checks the integration status of
the popup space. Integration checks are run every 10 minutes.
 : Edits the name and notification type of
the selected popup space, excluding the key value.
: Edits the name and notification type of
the selected popup space, excluding the key value.
 : Deletes the selected popup space. The
process can't be undone so proceed with caution.
: Deletes the selected popup space. The
process can't be undone so proceed with caution.
 :
Opens the SDK integration guide in a new window.
:
Opens the SDK integration guide in a new window.
 :
Opens the SDK download page in a new window.
:
Opens the SDK download page in a new window.
1-6. If SDK was integrated
successfully with the popup space, click the Add Pop-up Notice button to create one.

2. Create Notification Popup
Notification popups can be created in the
corresponding popup space.
2-1. Receiver: Select a user
group that will receive a notification popup.
Users that belong to the selected user group
are calculated in real-time to verify the expected recipients.
: Double checks the integration status of
the popup space. Integration checks are run every 10 minutes.: Edits the name and notification type of
the selected popup space, excluding the key value.: Deletes the selected popup space. The
process can't be undone so proceed with caution. :
Opens the SDK integration guide in a new window.:
Opens the SDK download page in a new window.

- All
Users: Sets every user who uses the app as recipients.
- User
Group: Sets your current user groups as recipients.
- Manual
Selection: Manually selects the user data value set while integrating SDK
as recipients.
2-2. Write Pop-up: Sets the name and
type of a notification to be registered.
- Campaign Name:
Register the name of a campaign to use for the admin.
- Notification Type:
Select the type of notification to register.
- Image
notification: Notifications consisting of images.
- Webpage
notification: Notifications consisting of web views.
2-3. Compose Notification: Add contents
according to the type of notification to register.
< Image Notification > 
- Register Image:
Images should be in JPG or PNG format with a resolution of 100 kb or less.
- Set Link:
Establishes a link to execute when clicking the image or link button.
- Disable: The link button will not be
provided and images can't be clicked.
-
Link: URL forms are available. Touch the image/link button to move to the
corresponding page.
- Deep Link: Select the pre-set Deep Link
here. Touch the image/link button to move to the corresponding page.- Link Button Text:
Compose texts to be displayed in the link button. Limited to 16 English
characters.
- Don't Show This
Again Today: Enable or disable this option.
< Webpage Notification >
- URL: Enter the URL
address of the webpage to register. If it is a notification, no preview
will be available.
- Don't Show This
Again Today: Enable or disable this option.
2-4. Schedule: Enter the period to
display the selected notification and set display limit.

- Pop-up Period: Sets a duration for displaying the selected notification.
- Set Max.
Number of Display: Sets the maximum number of displays to each user during
the notification period.
In order to display only once per user, set
the maximum display number as '1'.- Number of Day/Time exposure frequency per User: Sets a daily/hourly display frequency per user.
- Exposure Day (Mon-Sun): Sets a specific day to display the notification during the set
duration.
- Set Pop-up period: Sets a specific time range to display the notification during the
set duration.
2-5. Review & Register: Proceed to
the review/registration process on the prepared notification popup.
After this
review process is completed, register a test and proceed to authenticate
registration.

 :
Click this button to move to the selected position and edit the set
details.
:
Click this button to move to the selected position and edit the set
details.
 :
Brings up the page to register and set a test device.
:
Brings up the page to register and set a test device.
 :
Registers the selected notification as a test.
:
Registers the selected notification as a test.
2-6. Register Notification: Any and all
notification popups should be tested before registration.
2-6-1. Test Registration: Click
the Test Registration in the Review & Register page.
:
Click this button to move to the selected position and edit the set
details. :
Brings up the page to register and set a test device. :
Registers the selected notification as a test.

Notification
popup will be displayed in the test device set during the test registration
process for final confirmation.
2-6-2. Real
Registration: After the test registration is done, click the Finish button to
finish authenticating registration.

2-6-3. Notification Report:
Notifications that were tested and registered can be verified in the
notification reports.
If it
only completes up to the Test Registration stage, the Test will be displayed in the notification report.
3. Notification Report
Verify the
cumulative/daily/hourly analytics on all notifications.
3-1. Go to Pop-up Notice > Pop-up Notice Report to verify the status
of all notifications.

- Notification Category: Classified into 4 types according to
the status.
- Waiting : Notification is scheduled for display.
- Live : Notification is currently displayed to users.
- Hold : Live/standby notifications are temporarily
closed.
- Stop : Terminated or notification period has ended. :
A preview feature for registered notifications. (Previews are not
available for webpage notifications.)
:
A preview feature for registered notifications. (Previews are not
available for webpage notifications.)
 :
Displays the settings of the user group that is shown with the selected
notification (This features is not available when all users are selected).
:
Displays the settings of the user group that is shown with the selected
notification (This features is not available when all users are selected).
 :
Provides data by date and time on the display, clicks, notified users, and
clicking users .
:
Provides data by date and time on the display, clicks, notified users, and
clicking users .
 :
Edits the selected notification.
:
Edits the selected notification.
 :
Terminates the ticked notification. Verify the closed notification from
the Stop tab.
:
Terminates the ticked notification. Verify the closed notification from
the Stop tab.
3-2. Click the button in the selected notification to
verify more detailed data cumulatively, daily and hourly.
:
A preview feature for registered notifications. (Previews are not
available for webpage notifications.) :
Displays the settings of the user group that is shown with the selected
notification (This features is not available when all users are selected). :
Provides data by date and time on the display, clicks, notified users, and
clicking users . :
Edits the selected notification.:
Terminates the ticked notification. Verify the closed notification from
the Stop tab.
- Expected number of users received Push Message: Number of users who belong to the
targeting group for the notification popup. It is based on the previous
day's data.
- Impression: The total number of notification popup being
displayed. Move the cursor over [View Notification] to preview.
- Click: Number of clicks on the notification popup. It is not
available if a link wasn't provided.
- CTR: Total number of clicks/ Total number of displays *100
- Receiver: Displays a unique value of users who were
displayed with the notification popup.
- Click User: Displays a unique value of users who
clicked the notification popup.
- Conversion rate: Total number of users clicked / Total number
of notified users *100
- Targeting: List of options of the selected notification popup
such as targeting, schedule, display limit, etc.
3-3. In the bottom of the detailed
report, the daily/hourly data of that notification is available.
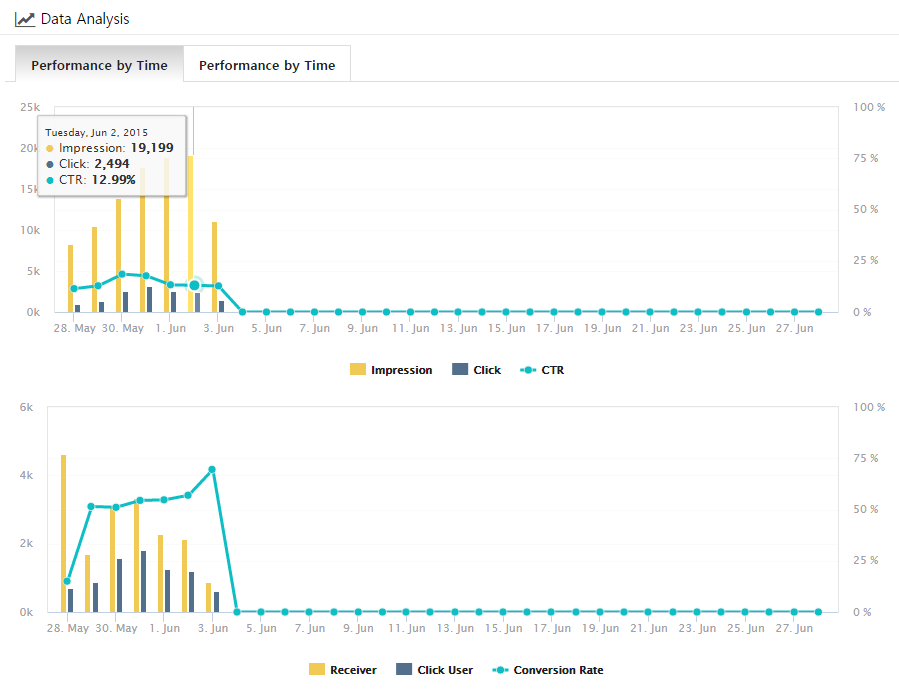
- Performance by Date: Data gathered during the notification
period on a daily basis.
- Performance by Time: Data gathered on the selected day on an
hourly basis.
4. Manage Notification Popups
Change the order of
notification displays and statuses that
are active, pending, or temporarily closed.
4-1. Go to Notification Popup > Manage Notification Popup page to manage notifications by popup spaces.
You can edit
the order of display, status, and notification messages by popup spaces.

 : Change
the order of notifications by clicking and dragging this button.
: Change
the order of notifications by clicking and dragging this button.
 :
Clicking this button brings up the drop-down menu. You can change the
status here.
:
Clicking this button brings up the drop-down menu. You can change the
status here.

: Change
the order of notifications by clicking and dragging this button. :
Clicking this button brings up the drop-down menu. You can change the
status here.
※ Notification Popup Image Guide
To register an image
notification popup, it should be registered according to the OS and
notification type.
- Android
|
|
Landscape |
Portrait |
|
1. Resolution |
1280*720 size |
720*1280 size |
|
2. Image size |
1280*640 pixels |
720*1200 pixels |
|
3. File format |
jpg, png |
jpg, png |
|
4. File size |
100 kb and less |
100 kb and less |
- iOS
|
|
Landscape |
Portrait |
|
1. Resolution |
960*640 size |
640*960 size |
|
2. Image size |
960*580 pixels |
640*900 pixels |
|
3. File format |
jpg, png |
jpg, png |
|
4. File size |
100 kb and less |
100 kb and less |